Appearance
Quick Start to BlueFox Email
Welcome to BlueFox Email! This guide walks you through everything you need to get started from creating your account to sending your first campaign. Follow the steps below to get up and running quickly.
Step 1: Create Your BlueFox Email Account
Head over to app.bluefox.email and sign up for a new account. Fill in the required information and verify your email address to complete the registration process. Once your account is created, log in to access the BlueFox Email dashboard.
When you log in for the first time, you’ll be greeted with a welcome screen that outlines a set of recommended setup tasks. You can either follow these steps or skip them and explore the platform on your own. For a condensed overview of the whole setup, see the Getting Started guide.
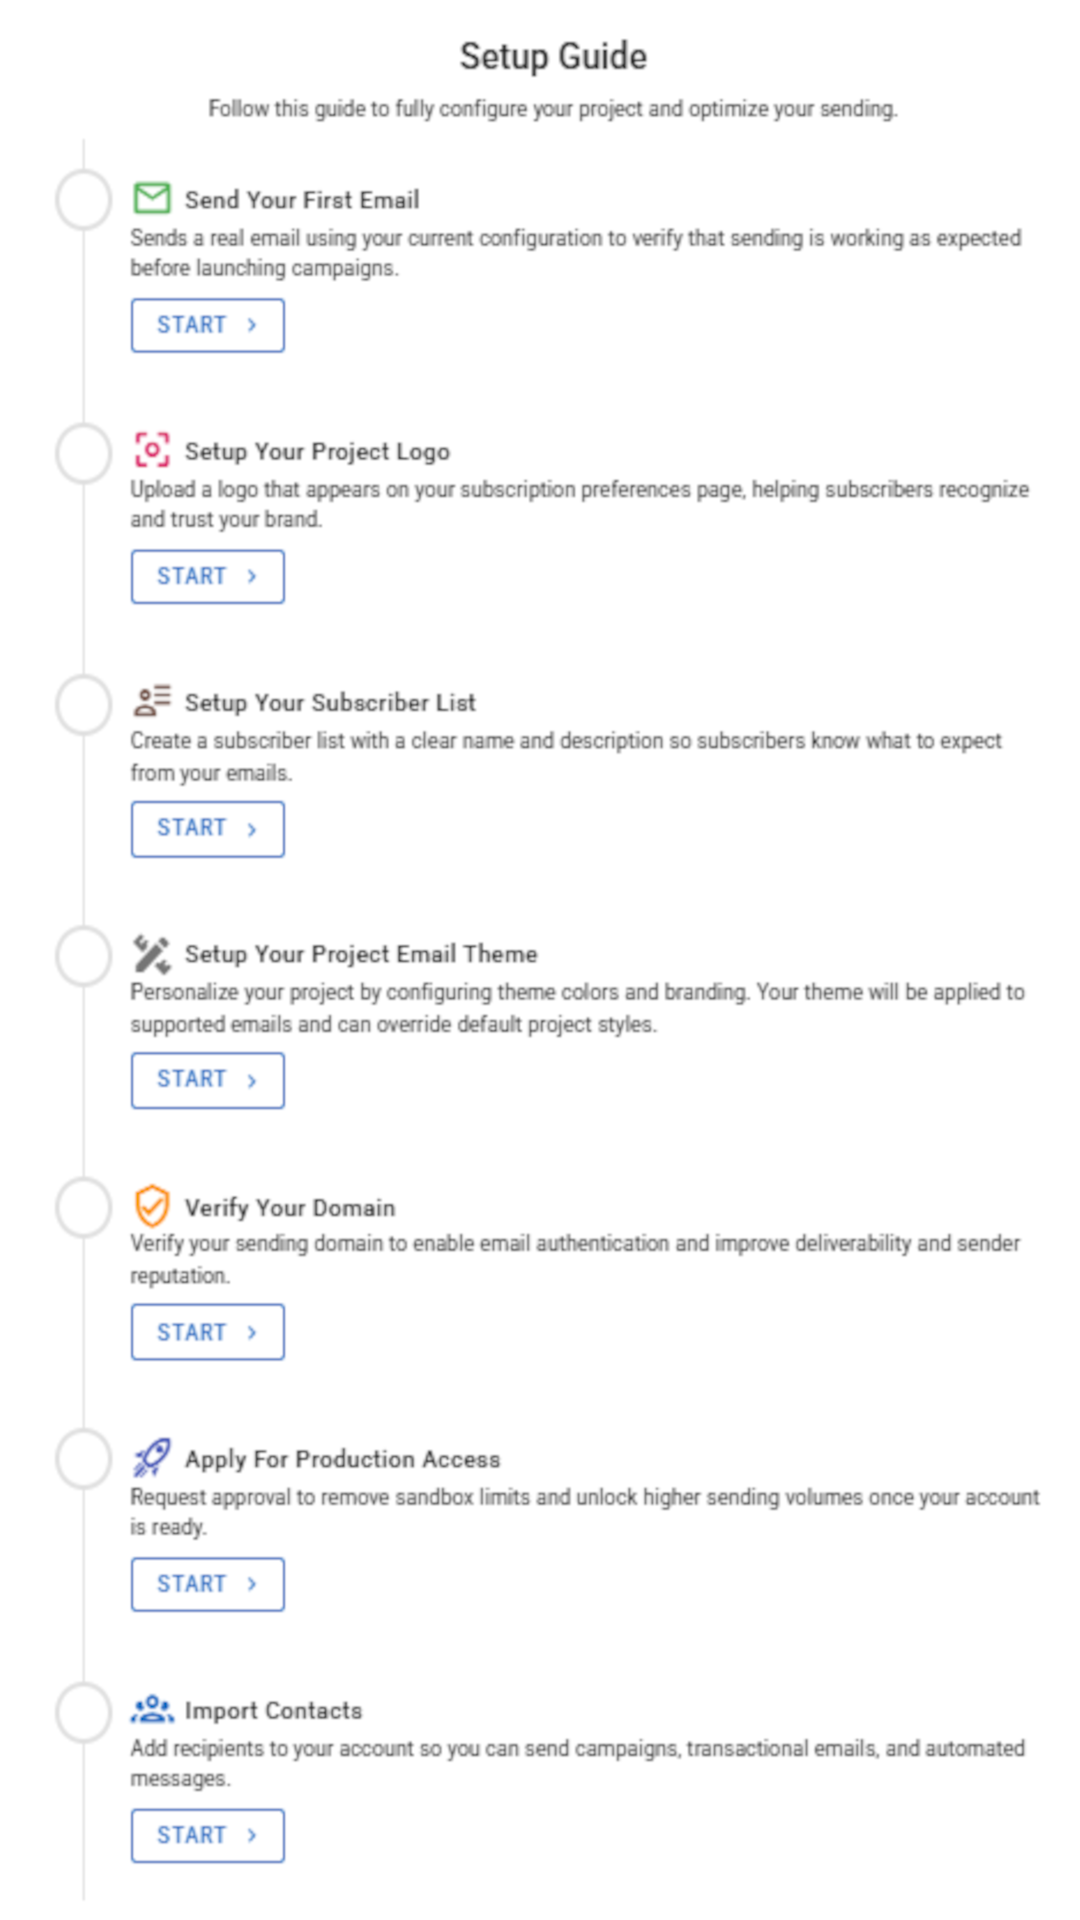
You’ll also notice that a project named “Sample project” is created automatically. You can use this project to explore BlueFox Email’s features or create a new project if you prefer.
Sandbox Mode
Every project is created in Sandbox Mode by default. In this mode, you can only send emails to a limited set of verified email addresses.
To send emails to non-verified addresses, you’ll need to request production access. This is covered later in the guide.
Learn more about delivery modes in this documentation page.
At this point, you already have everything you need to send your first test email. Let’s do that next.
Step 2: Sending Your First Test Email
Before sending an email to your entire audience, it’s recommended to send a test email first. This allows you to preview how the email looks in your inbox and make any necessary adjustments.
To send a test email, open the email campaign you created and click Send Test Email. Enter an email address and send the test. Check your inbox and refine the content if needed.
You can send a test email to:
- A specific email address, or
- A private subscriber list
WARNING
Since your project is still in Sandbox Mode, test emails can only be sent to verified email addresses. Make sure to verify any address you want to use for testing.
You can learn how to verify email addresses in this documentation page.
And voilà! You’ve successfully created and sent your first email using BlueFox Email. Now here you might be wondering why the emails are being sent from a bluefoxemailsandbox.com domain. That’s because your project is still missing a verified sending domain. We will fix that later in this guide.
This guide covers only the essentials to help you get started quickly. There’s much more you can explore to enhance your email marketing efforts.
The next logical steps include:
- Configuring your domain
- Requesting production access
- Adding contacts
- Sending emails to your full audience
Before doing all that, it’s recommended to personalize a few project settings first. Let’s start with those.
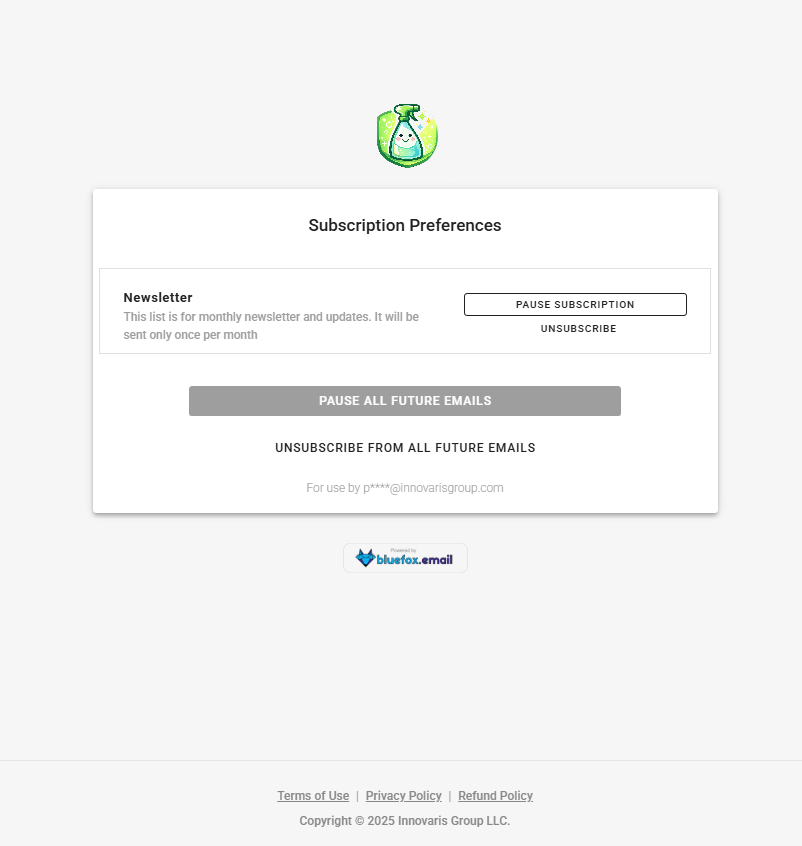
Step 3: Subscription Preferences Page
BlueFox Email provides a subscription preferences page where subscribers can manage their email subscriptions, such as opting out of specific lists.
For this page to be meaningful, subscribers need to clearly understand:
- Which brand the emails are coming from
- Which lists they’re subscribed to
- What each list represents
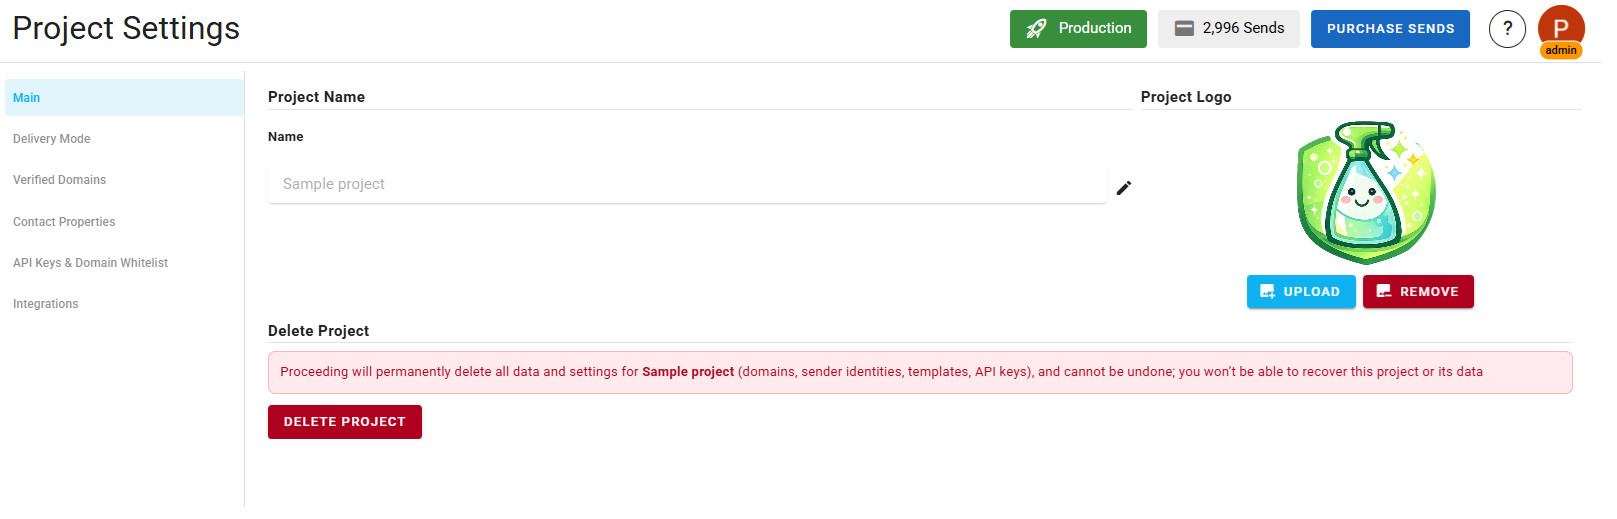
Start by navigating to Project Settings. In the main tab, set a proper project name and upload your brand logo. This information appears on the subscription preferences page. For this tutorial we have a dummy brand with us called "SparksPro Cleaning" and we will set the project name and logo accordingly.
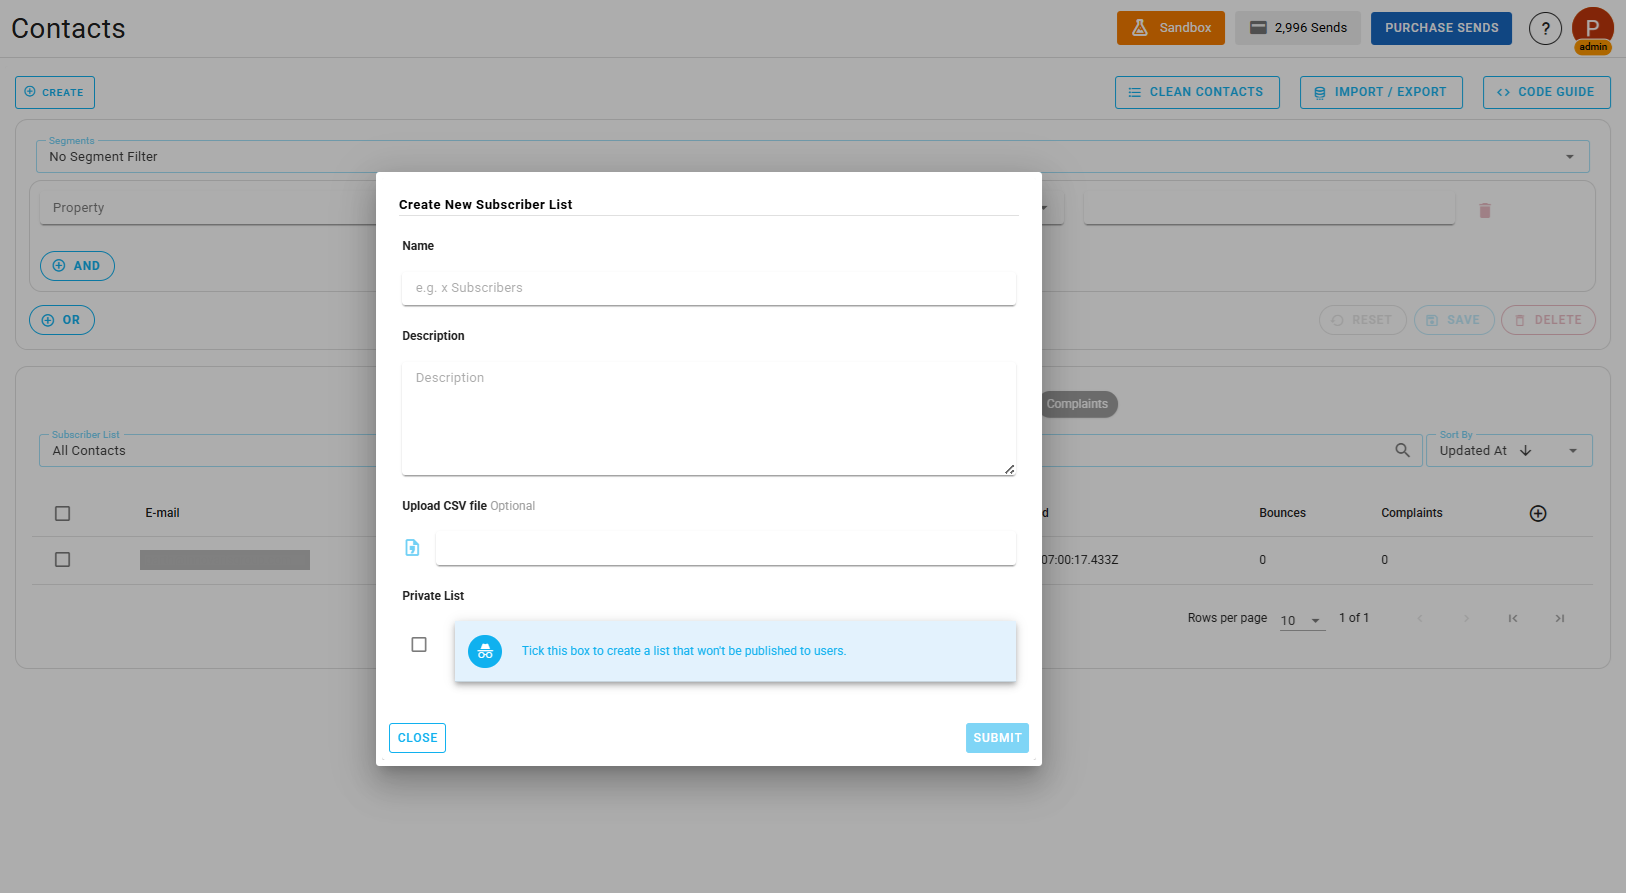
Next, go to the Contacts section and create or edit your subscriber lists.
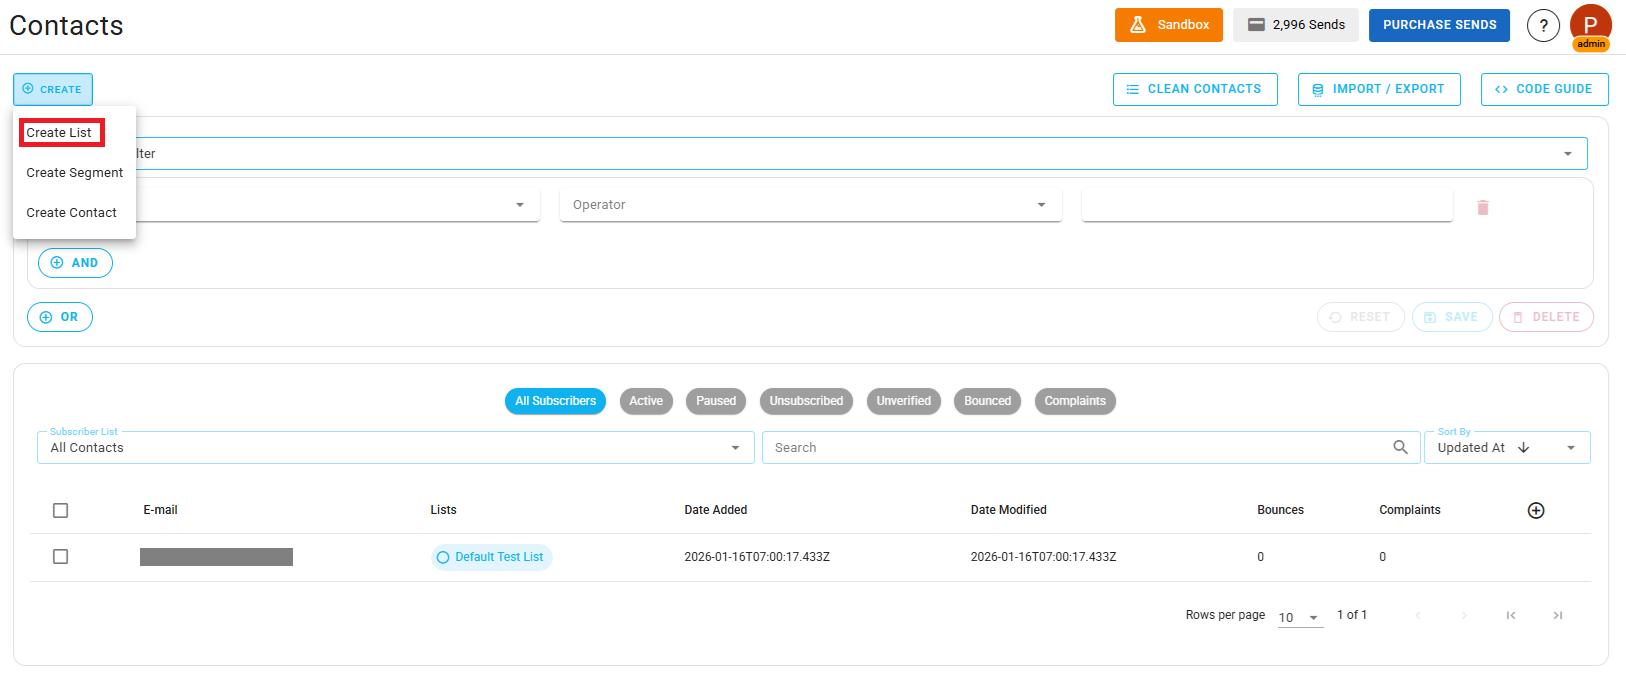
Make sure each list has a clear name and description, as this information is also shown to subscribers.
That’s it your subscription preferences page is now personalized. You can check this out by sending a test email to yourself and clicking the unsubscribe link at the bottom of the email. This will take you to the subscription preferences page where you can see your project logo and subscriber lists.
Step 4: Email Theme Settings
Next, let’s personalize your email themes. Navigate to the your project's Email Theme section of your project.
You’ll see a default theme that includes colors, fonts, images, links, etc . We recommend customizing this theme to match your brand identity.
Click Edit to modify the theme. You can update colors, fonts, logos, and more. Once saved, this theme will be applied to all email campaigns by default.
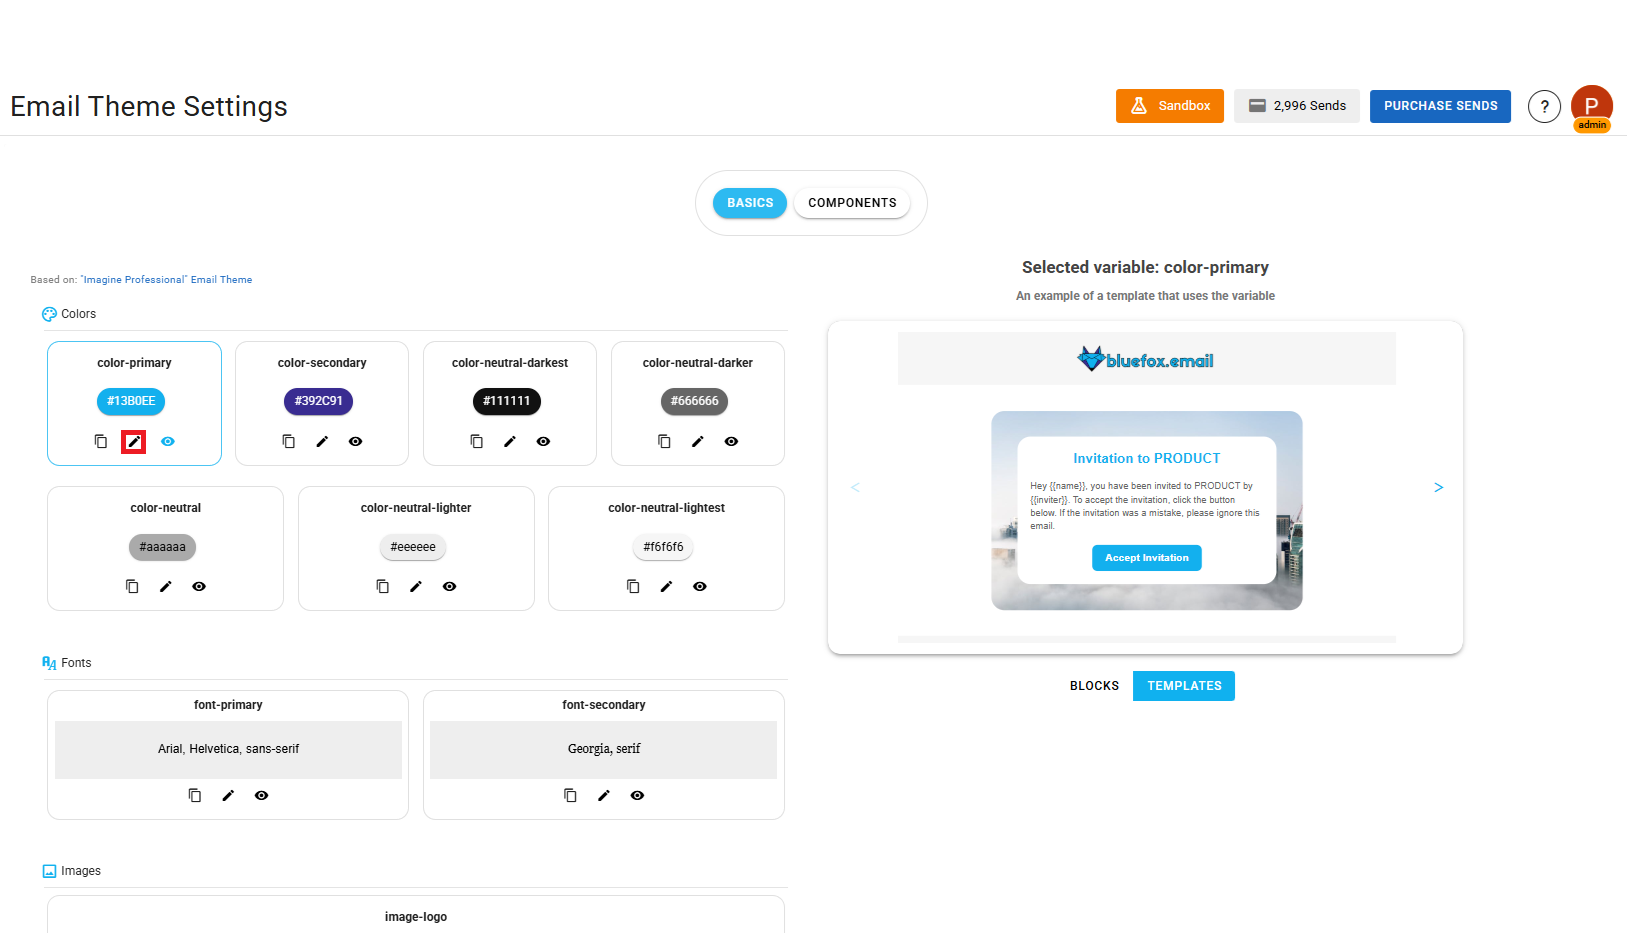
For this tutorial, we will also change email theme settings for our "SparksPro Cleaning" brand, we will modify the theme and add our logo and brand primary colors here.
Here is a quick before and after of our email theme customization: Before/After Email Theme Customization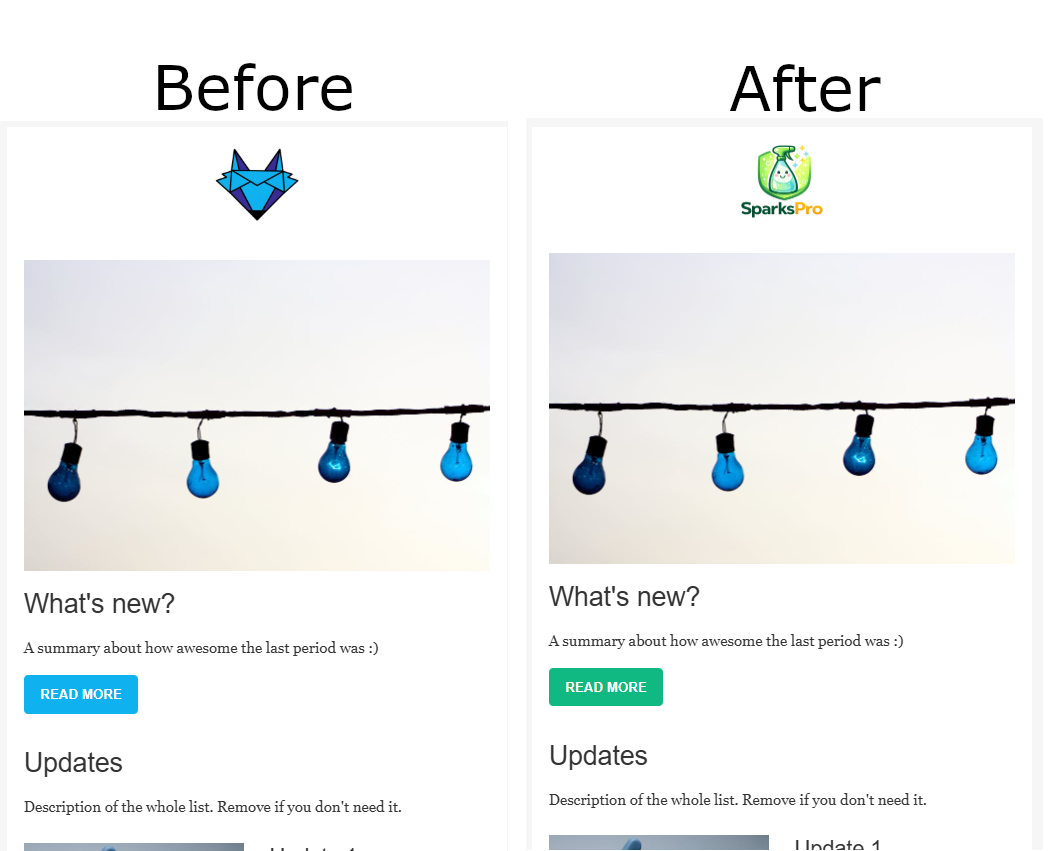
Step 5: Configure Your Domain
Configuring your domain allows you to send emails from your own domain, instead of the default bluefoxemailsandbox.com domain.
By default, projects in Sandbox Mode can only send emails to verified email addresses. To send emails to real recipients using your own domain, domain configuration is required.
To configure your domain, go to Project Settings then Verified Domains and click Add Domain.
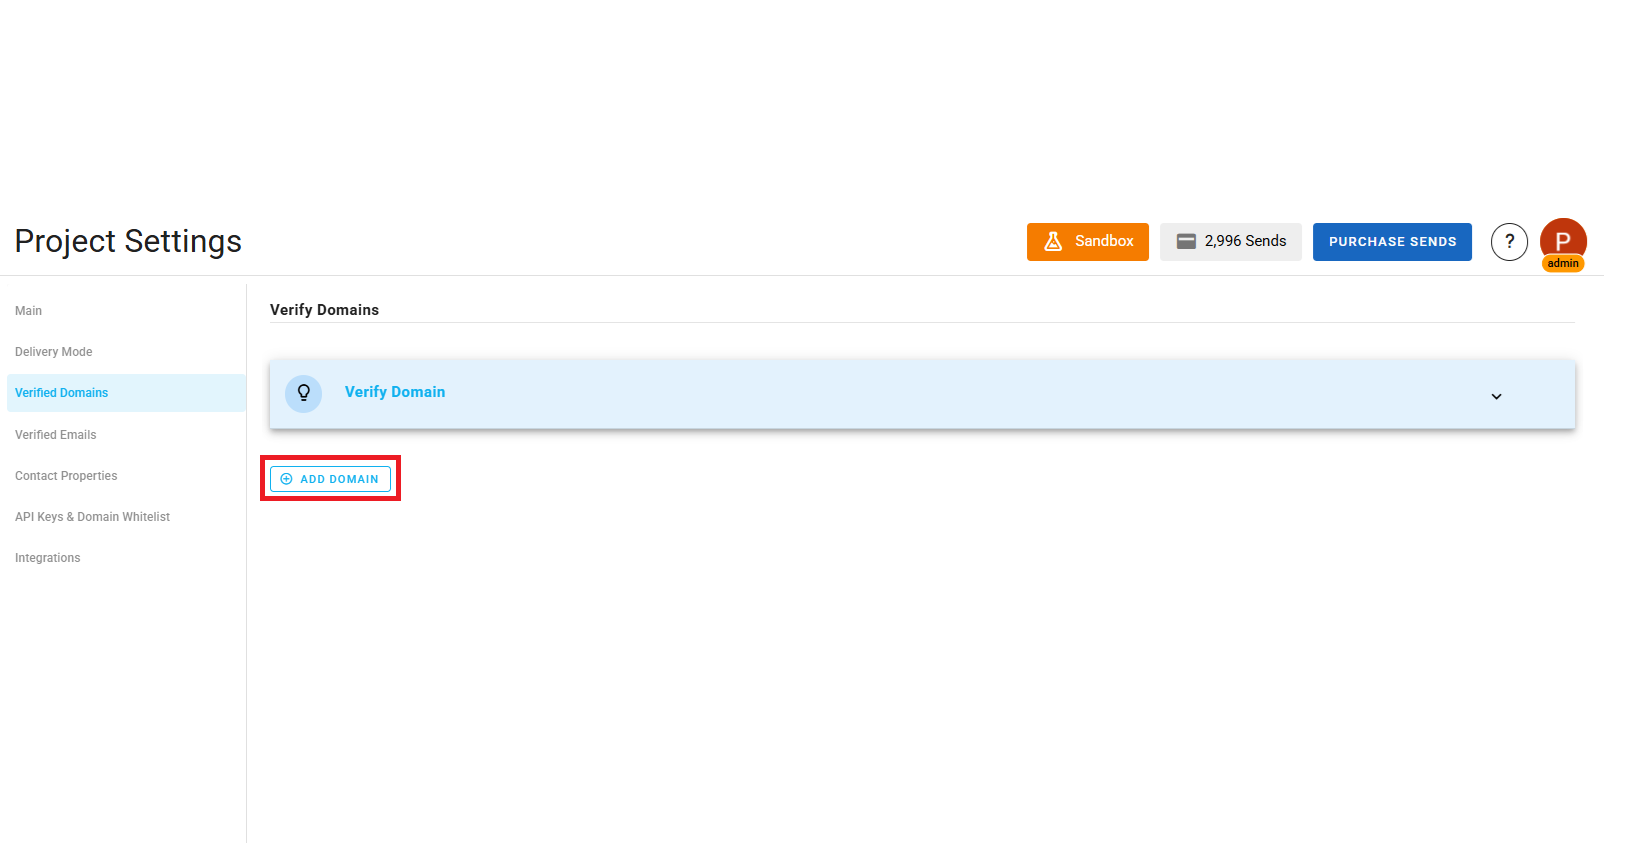
Enter your domain name and select the appropriate region. The selected region determines where your emails will be sent from.
BlueFox Email will generate authentication records such as DKIM, SPF, and DMARC:
- DKIM and SPF are mandatory to send emails
- DMARC is optional, but recommended for additional protection
Add the provided records to your domain’s DNS settings to complete the setup.
Once configured, your emails will be sent from your own domain instead of the bluefoxemailsandbox.com domain, making them ready for real-world sending.
Step 6: Request Production Access
While in Sandbox Mode, you can only send emails to verified addresses. To remove this limitation, you must request production access.
Go to Project Settings then Delivery Mode tab and click Apply for Production Access. Provide details about your email-sending use case and practices.
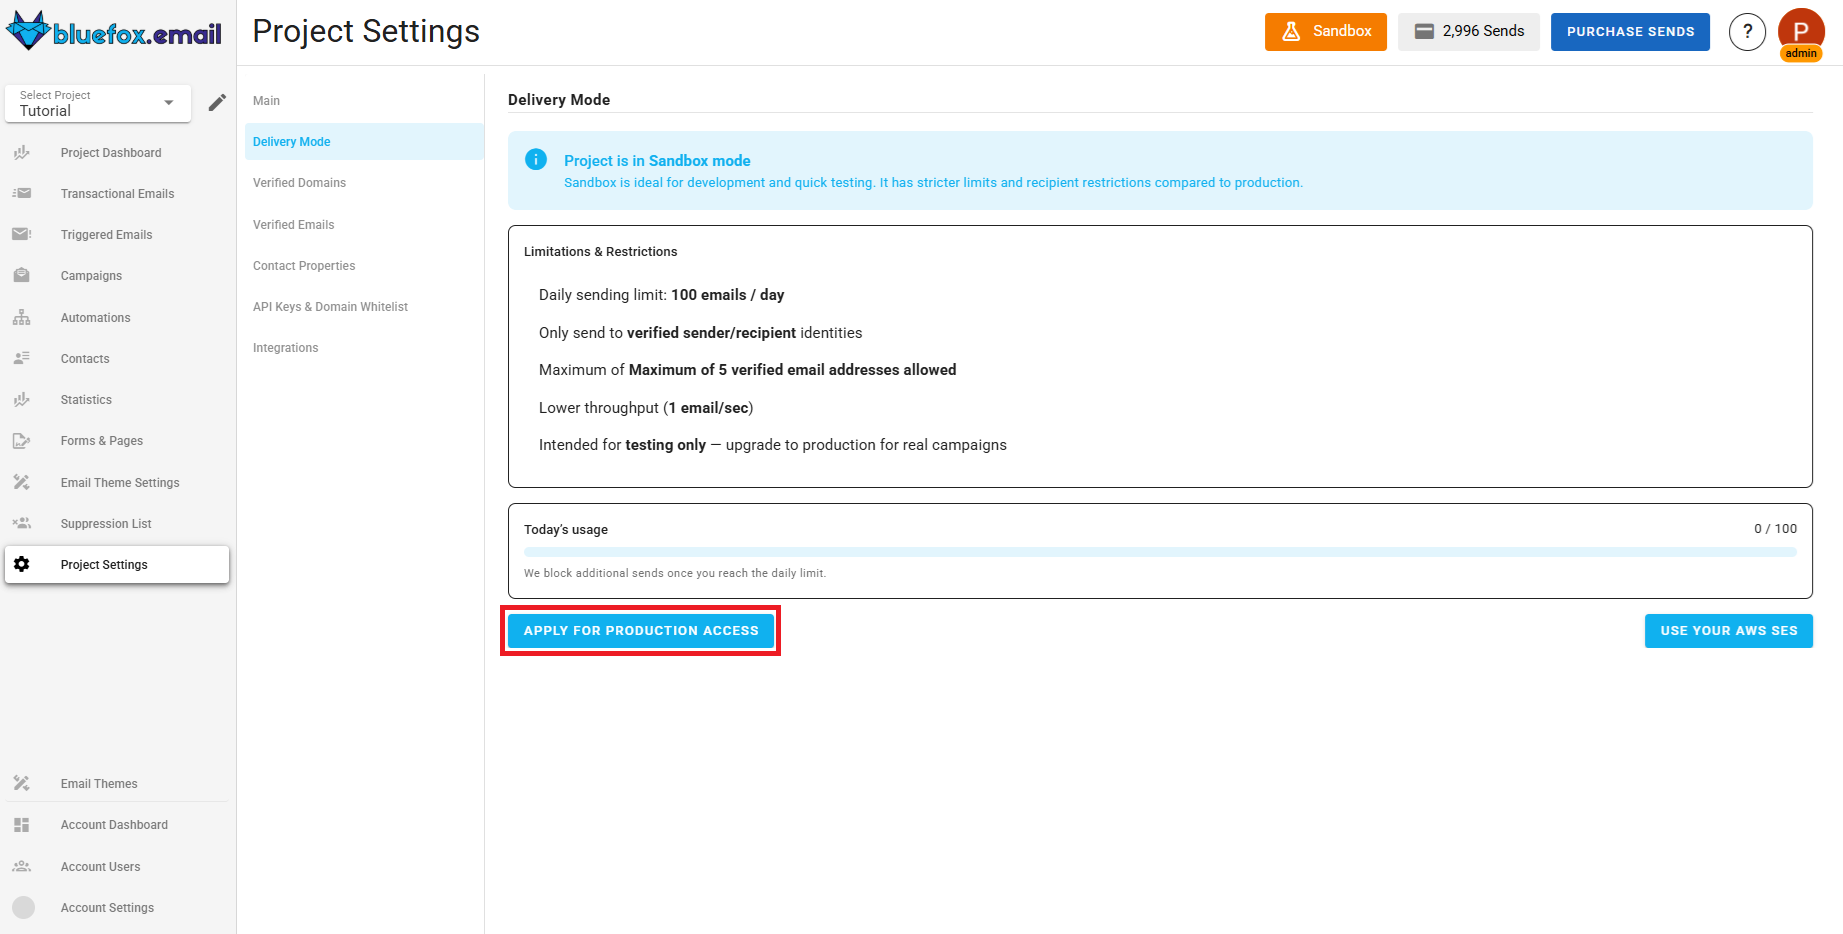
The BlueFox Email team will review your request. Once approved, your project will move to Production Mode, allowing you to send emails to any address without restrictions.
Learn more about delivery modes here: Delivery Modes.
Step 7: Add Your Contacts
Before sending emails to your audience, you need to add contacts to your project.
Navigate to the Contacts section and click Add Contacts. You can:
- Add contacts manually, or
- Import them from a CSV file
When importing contacts, ensure that you email column because it is required. You can also include additional fields like first name, last name, etc., to personalize your contacts but make sure that you have add those in your custom contact properties in your project settings before importing.
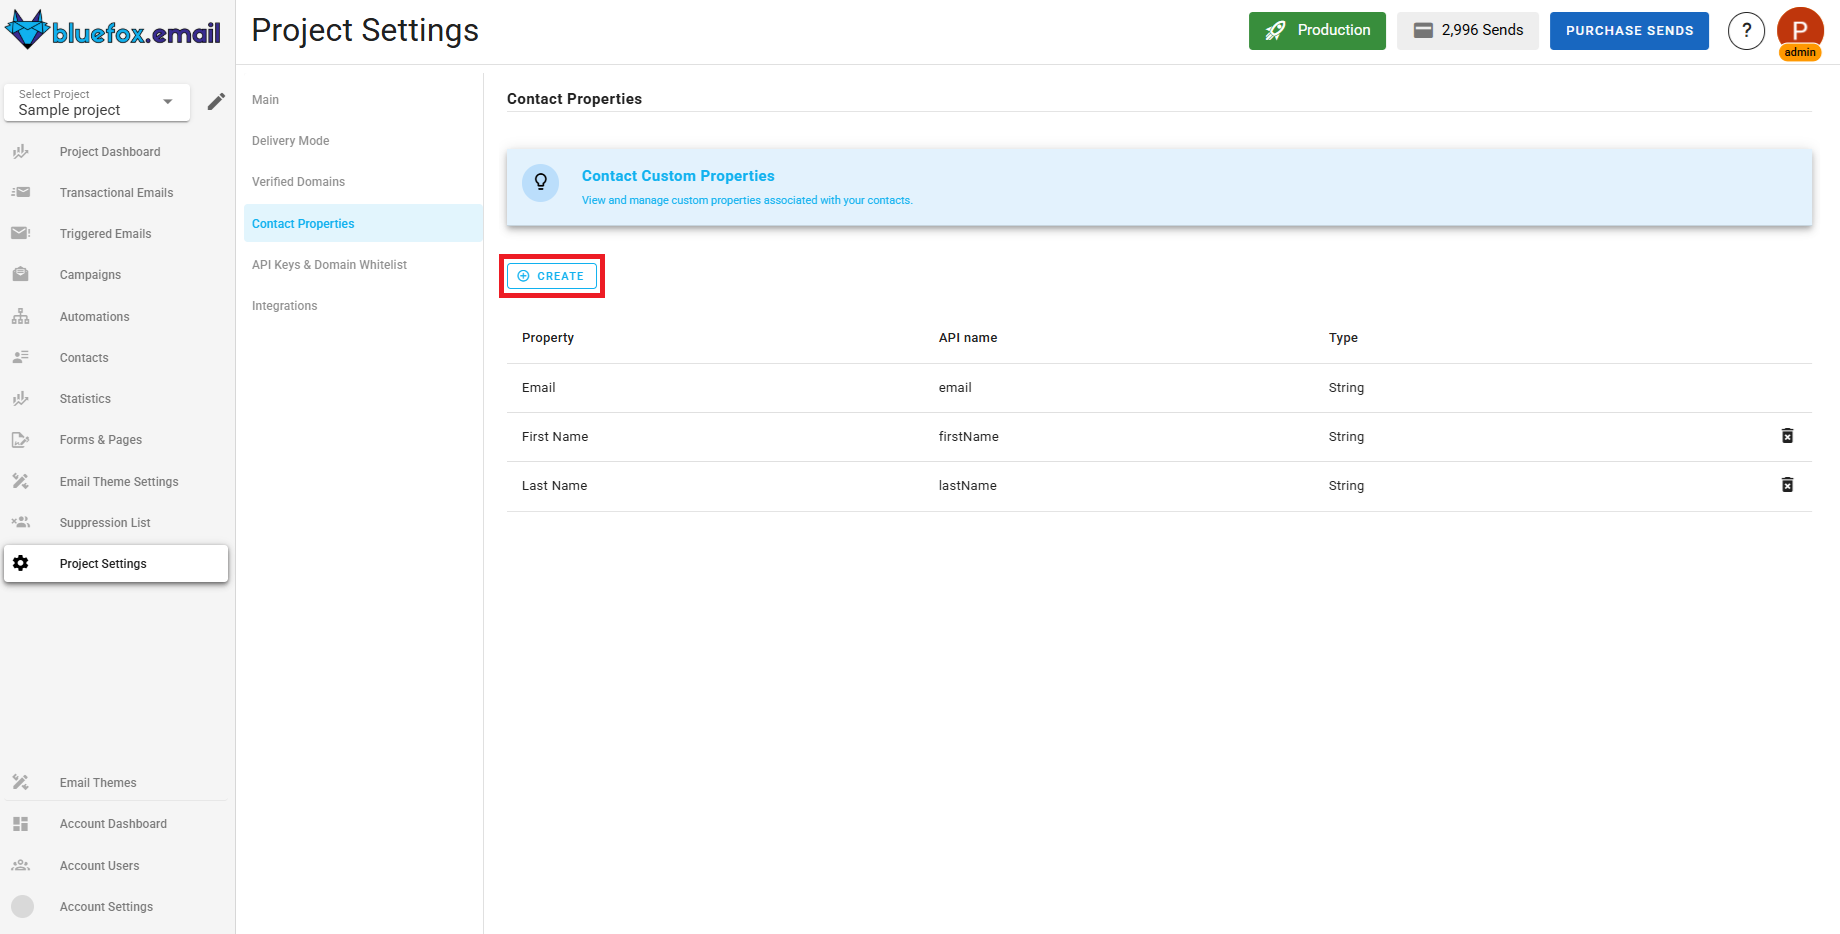
Here just look at the API name and edit that as your CSV header while importing contacts.
To keep your audience organized and improve targeting, group contacts into subscriber lists. You can also segment contacts based on various criteria to send more personalized and relevant emails.
TIP
The larger and more detailed your contact database, the more effectively you can segment your audience and the better results you’ll achieve from your email campaigns.
Step 8: Start Sending Emails
At this point, everything is in place:
- Your project is personalized
- Your domain is configured
- Your contacts are added
- Your project is in Production Mode
- You can now send your first real email campaign.
From the campaigns, click Send to send immediately, or Schedule to deliver your campaign at a later time.
That’s it, you’re officially ready to start sending email campaigns with BlueFox Email.